No products in the cart.
Game console
Retroid Pocket 2+ Plus คู่มือวิธีการติดตั้วใหม่Start up
Start up
1. เชื่อมต่อ WIFI ไม่ต้อง Log-in หรือติดตั้งอะไรก่อนข้ามไปที่ Setting
2.ไปที่การตั้งค่าการอัปเดตระบบ Setting – update เครื่องจะ reboot เอง
3.ไปที่ Setting -handheld-setting-advanced-re-entry setup wizard
4. เลือก pre-install app ทั้งหมด
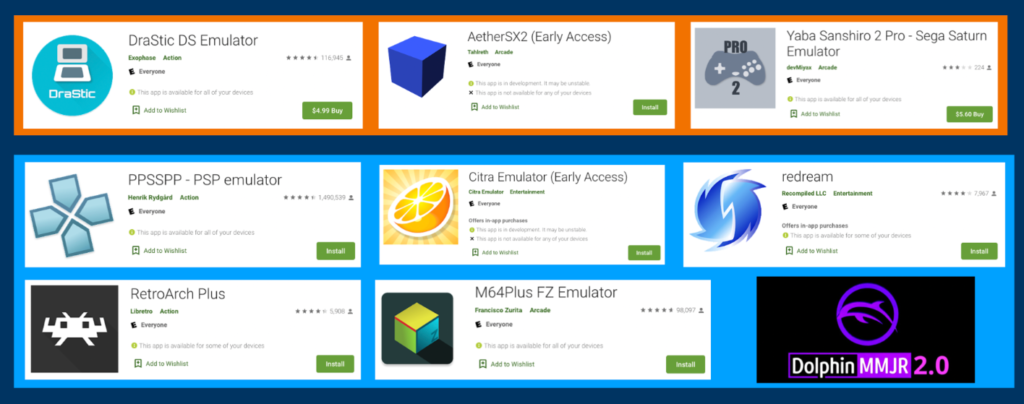
install emulators อีมูเลเตอร์ที่สำคัญ
RETROARCH (สำหรับเกมเก่าเช่นGBA GBC MD )
อีมูเลเตอร์แบบสแตนด์อโลน PS PSP SS
Recommended emulators:
DraStic (Nintendo DS)
AetherSX2 (PlayStation 2)
Yabasanshiro 2 Pro (Saturn)
Recommended streaming apps:
NVIDIA GeForce Now (PC & cloud streaming)
AMD Link (PC streaming)
Parsec (PC streaming)
Google Stadia (cloud gaming)
PSPlay (PS4 & PS5 remote play)
Xbox or Xbox beta (Xbox One/Series remote play)
Download the important Bios ดาวน์โหลดไบออสที่สำคัญ
SEGA CD:
bios_CD_E.bin
bios_CD_J.bin
bios_CD_U.bin
FAMICOM DISK SYSTEM:
disksys.rom
GAME BOY (for boot logo):
gb_bios.bin
GAME BOY COLOR (for boot logo):
gbc_bios.bin
GAME BOY ADVANCE:
gba_bios.bin
NEO GEO:
neogeo.zip
PLAYSTATION:
scph1001.bin
PLAYSTATION 2:
SCPH-90001_BIOS_V18_USA_230.DIFF
SCPH-90001_BIOS_V18_USA_230.INF
SCPH-90001_BIOS_V18_USA_230.MEC
SCPH-90001_BIOS_V18_USA_230.NVM
SCPH-90001_BIOS_V18_USA_230.ROM0 (most important one)
SCPH-90001_BIOS_V18_USA_230.ROM1
TURBOGRAFX-CD:
syscard1.pce
syscard2.pce
syscard3.pce
SEGA SATURN
saturn_bios.bin
SEGA DREAMCAST
dc_boot.bin (renamed to boot.bin)
2 สร้างโฟลเดอร์ใหม่ชื่อ bios และย้ายไฟล์ที่ดาวน์โหลดมาไว้ในนั้น
3 สร้างโฟลเดอร์ใหม่ชื่อ rom แล้วย้าย rom เกมที่ดาวน์โหลดมาไว้ ตั้งเชื่อ Sub-Folder เช่น SF SFC GB GBA GBC MD N64 PSP SS PS1 PS2 NES 3DO DOS จะได้จัดการง่าย
เว็บไซต์ที่ท่านสามารถดาวน์โหลดเกมได้
1. www.emulatorgames.net
2. roms-download.com
3. romhustler.org
4. wowroms.com/
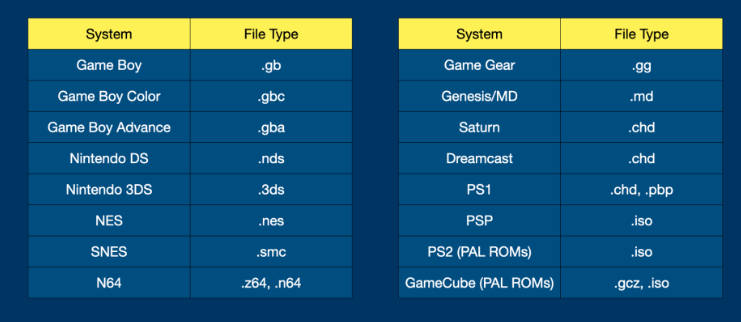
ตัวอย่างExtension of ไฟล์ของrom
การตั้งค่า RetroArch
การตั้งค่าค่อนข้างยุ่งยาก เลยมีไฟล์ retroarch.cfg – retrogamecorps.com ที่กำหนดปุ่มลัด การปรับขนาด และความละเอียด และอื่น ๆแล้ว วางไฟล์นี้ไปที่ Android > data > com.retroarch.aarch64 > โฟลเดอร์ไฟล์ที่พบในที่จัดเก็บข้อมูลภายใน RP2+ เรายังต้องตั้งค่าที่เฉพาะคอนโซล เช่น การสนับสนุนการกรอกลับสำหรับ NES เป็นต้น
PS1 PS2 SS จะใช้ emulator stand aloneโดยตรุงจะดีกว่าการ เพราะ มีoptionsเอยะกว่าและวิ่งsmoothกว่า
Recommend setting
Game Boy / Game Boy Color
Emulator: RetroArch (Gambatte core)
Filter: Normal 2x
Rewind Support: ON
Colorization: Internal / Special 1
Interframe Blending: LCD Ghosting (Accurate)
Game Boy Advance
Emulator: RetroArch (mGBA core)
Filter: Normal 2x
Rewind Support: ON
Nintendo Entertainment System
Emulator: RetroArch (FCEUmm core)
Filter: Normal 2x
Rewind Support: ON
Run-Ahead: ON (1)
Super Nintendo Entertainment System
Emulator: RetroArch (Snes9x core)
Filter: Normal 2x
Rewind Support: ON
Run-Ahead: ON (1)
If a game experiences slowdown (for example, with Final Fantasy III or Super Mario RPG), then toggle off Rewind Support or Run-Ahead for performance improvements. RPGs in particular generally won’t benefit from those two settings anyway. 99% of games should run at top speed with the above settings.
Sega Genesis and Sega CD
Emulator: RetroArch (Genesis Plus GX core)
Filter: Normal 2x
Rewind Support: ON
Run-Ahead: OFF (causes jittery gameplay when ON)
Notes: The Retroid Launcher frontend currently does not have Genesis/CD/32X listed as a possible option. If you want to use the Retroid Launcher as your primary launcher but still want to play Genesis games, I recommend setting up RetroArch playlists.
Sega CD games will require BIOS files to run correctly, and they are listed in the BIOS section above.
TurboGrafx-16 (PC Engine) / TurboGrafx-CD (PC Engine CD)
Emulator: RetroArch (PCE Beetle Fast)
Filter: OFF (remove the Normal 2x filter and then do a core override)
Rewind Support: OFF
Run-Ahead: OFF
TG-CD and PCE-CD games will require BIOS files to run correctly, and they are listed in the BIOS section above. Like with Sega Genesis, there is no TG-CD or PCE-CD section in the Retroid Launcher, so your best bet is to use RetroArch playlists.
Sony PlayStation
Emulator: RetroArch (PCSX ReARMed core)
Filter: OFF (remove the Normal 2x filter and then do a core override)
Rewind Support: OFF
Run-Ahead: OFF
Emulator: DuckStation standalone
Enhancements: 2x resolution (may cause slowdown with some games)
PGXP Geometry Correction: ON (may cause slowdown with some games)
Controller Type: Analog Controller
Use Analog Sticks for D-Pad in Digital Mode: ON
Notes: Sony Playstation games will all play on the RetroArch core without issue, but you can also use the standalone Duckstation emulator, which is more accurate and will allow you to use 2x resolution in many games. Adding geometry correction will further enhance the visuals, but come with another performance cost.
See the Starter Guide video 2 for configuring analog controls in RetroArch; note that after making the video I found a way to force analog controls in all PS1 games with DuckStation, and those options are now listed above.
The 32-bit version of RetroArch actually works best with PlayStation 1, because the PCSX ReARMed core that comes with it allows for 2x resolution (“enhanced resolution”) while maintaining excellent performance. However, this version of RetroArch is currently not working with the Retroid Launcher. So you can use RetroArch’s playlist function to launch your games, or modify the apk’s androidmanifest.xml file and replace any instances of package name “com.retroarch.ra32” to “com.retroarch” to trick the launcher into booting the 32-bit version instead.
Nintendo 64
Emulator: Mupen64Plus-FZ
The version of Mupen64Plus-FZ that ships with the RP2+ has been updated by the developer specifically for this system. To get these updates, you will want to uninstall the version of the app that comes with the device, and then install the Google Play Store version instead.
The developer of Mupen64Plus-FZ recommends creating this default emulation profile specific to the Retroid Pocket 2+.
In the left menu bar, select Profiles > Emulation
Select the GlideN64-Very-Accurate profile and then Copy. Give it a unique name, like “Chicken”.
Make the following changes in the profile:
Use Faster Shaders > ON
Use Native Resolution Factor > 1x
Next, in the left menu bar, select Profiles > Select Profiles > Emulation profile > Chicken. This will make your new profile the default emulation profile.
Finally, in the left menu bar, select Settings > Shaders and make the following changes
Shader scale factor > 1x
Shader Passes > Pass 1 > FXAA
To improve the navigation experience, go into Settings > Input > Show in-game menu > When slide gesture is used. Now, you can swipe from the left side of the screen to bring up the Mupen64 side panel when in a game, to easily save your game, exit, etc.
By default the N64 A and B buttons will be mapped to the A and X buttons on the RP2+. If you want to adjust your mappings, you will need to copy the Android Gamepad controller profile and make your own mapping (much like how we just set up the emulation profile above).
When using the Retroid Launcher, autosave and autoload will not work properly. Instead, you can either launch games directly from the standalone emulator, or use the Save/Load State functions within the emulator quick menu to manually save and load states. In-game saves still work fine either way.
The Pro version of this emulator costs $4 and will give you the ability use cloud saves and netplay. However, it won’t work with the Retroid Launcher by default. To add it to the Retroid Launcher, install the app, then add these parameters in the “Edit” section of the Retroid Launcher:
Name; M64Plus FZ Pro
Package: org.mupen64plusae.v3.fzurita.pro
Activity: paulscode.android.mupen64plusae.SplashActivity
Data type: */* (no spaces between asterix and slash)
Check the Retro Handhelds compatibility spreadsheet for recommended settings on a per-game basis.
Nintendo DS
Emulator: DraStic
Frameskip: OFF
High-Resolution Rendering: ON
Notes: I recommend using L2/R2 as your L/R buttons on the console. You will need to remap your controls, and then set up screen swap functions assigned to unused buttons (like L1/R1 or L3/R3). See the Part 2 video above for a demonstration.
In the Part 2 video above, I recommended turning the touchscreen controller opacity to 0% to hide the buttons. I later learned that this can affect touchscreen performance since the buttons are still there. Instead, start up a game and enter the Menu, then select Edit Screens and Virtual Pad. Here, choose “Landscape Aspect” > Menu > Edit Controller Layout. Go through and tap on each button and then disable them, t hen select Apply. When that is complete, select Menu > Save as global layout. Repeat this process for the “Landscape 1:1” layout as well. This will remove the buttons altogether so they don’t inhibit touchscreen gameplay.
Sega Saturn
Emulator: Yabasanshiro 2 (or Pro version to remove ads)
Frameskip: ON (default)
Rendering Resolution: Original (1x)
Sound Engine: Legacy (toggle with Modern as needed to improve performance)
Sound Time Synchronization Mode: Real Time
Notes: You will need to remap your controls. I recommend using YBA for ABC, and L1, X, R1 for XYZ buttons.
If you want the original Saturn boot video sequence, you must place the BIOS file (saturn_bios.bin) in the yabause/bios folder on your internal storage (this folder will only appear once you have opened the app at least one time).
Check the Retro Handhelds compatibility spreadsheet for recommended settings on a per-game basis.
Sega Dreamcast
Emulator: ReDream
Frameskip: ON (default)
Notes: You will need to remap your controls. Upgrading the pro version won’t do much on the RP2+ other than remove the prompt to upgrade to pro when you start up the emulator. However, it will be associated with your Google Play Store profile and can be used on other devices (like your phone) to get upgraded rendering resolution.
If you want the original Dreamcast boot video sequence, you must rename the dc_boot.bin BIOS file to boot.bin and place it in the Android/data/io.recompiled.redream/files/ folder on your SD card (this folder will only appear once you have opened the app at least one time).
Sony PSP
Emulator: PPSSPP
Graphics Backend: OpenGL (alternate with Vulkan to assess performance on games)
Internal Resolution: 2x (reduce to 1x for better performance)
Show FPS/Speed: BOTH
Touchscreen overlay: OFF
Frameskip or auto frameskip: 1x (only for games that need it)
Notes: You will need to remap the ABXY buttons. For games that don’t run at full speed, consider adding auto frameskip or dropping the internal resolution to 1x.
Check the Retro Handhelds compatibility spreadsheet for recommended settings on a per-game basis.
Nintendo GameCube
Emulator: Dolphin MMJR2
Internal resolution: .7x (reduce as needed to improve performance)
Notes: Use PAL ROMs as available. Be sure to download and install the MMJR2 community configuration files, which will work with the Dolphin emulator to give you the best performance. Place the two .ini files in the MMJR revamp/config folder in your internal storage (the app must be opened once before for this folder to appear) and replace the files that are in there already. See the Part 2 video above for a demonstration.
Check the Retro Handhelds compatibility spreadsheet for recommended settings on a per-game basis.
Sony PlayStation 2
Emulator: AetherSX2
Preset: Fast/Unstable
Enable Frame Limit: toggle OFF as needed to improve performance
EE Cycle Rate: 60% (adjust to 50% as needed)
EE Cycle Skip: Maximum Underclocking (3)
Notes: Use PAL ROMs as available. You will need to remap the buttons, and follow the instructions in the Part 2 video to toggle touchscreen controls.
references : https://retrogamecorps.com/2022/01/16/retroid-pocket-2-starter-guide/